Commissioning checklist • Sensor tuning • Timeouts • Basin geometry
Touchless faucets usually work the moment they’re powered, but that is not the same as being commissioned. In AEC projects, the gap between “it turns on” and “it performs reliably for years” is almost always created by three variables that sit at the intersection of architecture, plumbing, and controls.
- Basin geometry and surface behavior (shape, depth, slope, finish, reflectivity)
- Sensor tuning (activation window, range, sensitivity, cross-talk avoidance)
- Timeout and run logic (metering, safety shutoff, anti-flood behavior, cleaning behavior)
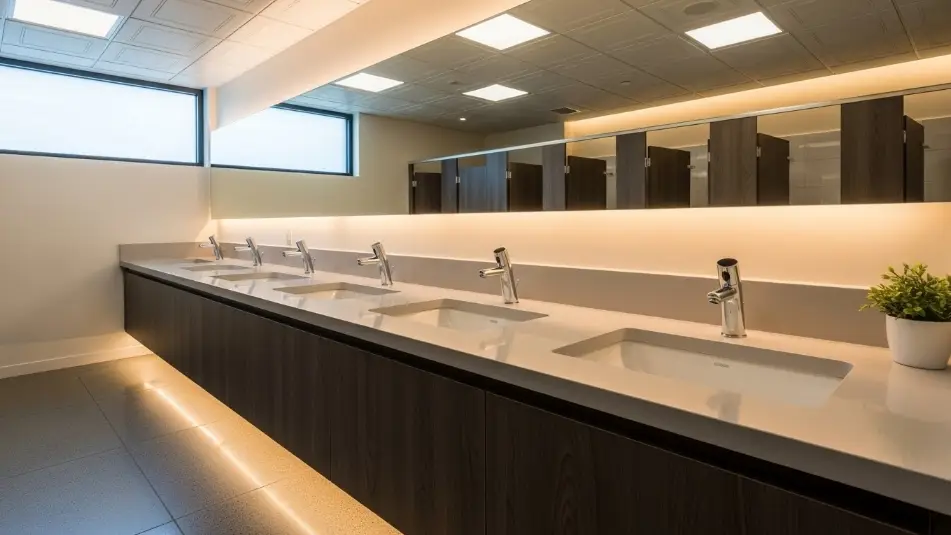
This workflow is for commercial restrooms and assumes real-world conditions like hard water, reflective basins, mixed lighting, and cleaning crews triggering sensors repeatedly.
Why commissioning matters more than brand selection
Most sensor faucet service tickets are not caused by bad products. They are caused by mismatched assumptions:
- The faucet is tuned on a test bench, then installed over a highly reflective basin with a shiny drain, creating false triggers.
- Timeouts are left at default, causing either run-on water waste or user frustration when the faucet shuts off mid-wash.
- The sensor sees movement or reflections from adjacent fixtures, resulting in ghost activations.
- Aerators and strainers clog after construction debris, and the faucet is blamed for sensor failure.
Part 1: Basin geometry pre-check
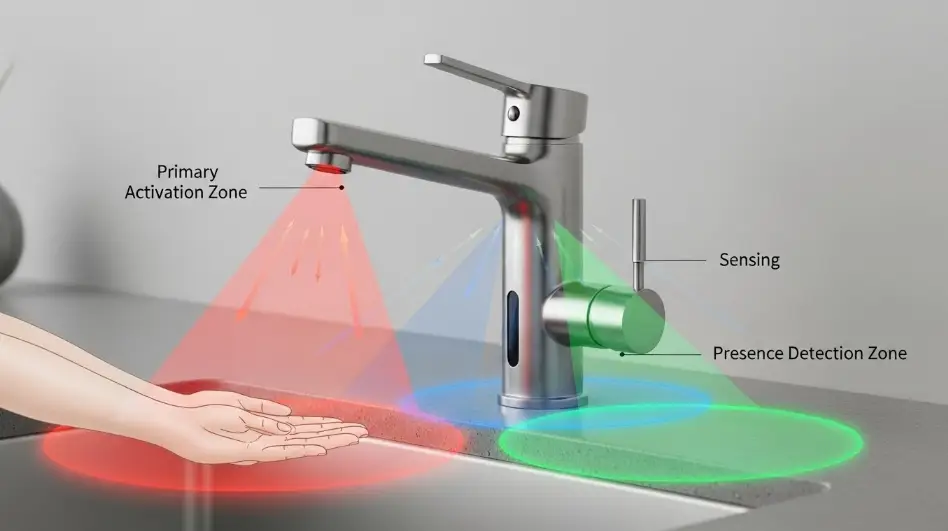
Before you touch sensor settings, verify the basin and spout geometry. The goal is simple: hands should be detected where water actually lands, and splash should be controlled.
What matters in basin geometry
- Spout reach relative to drain: if water lands too close to the front edge, users move hands back and forth and the sensor cycles. If it lands too far back, splash increases.
- Basin depth and slope: shallow basins and flat slopes splash more and can reflect infrared signals.
- Finish reflectivity: polished stainless and glossy porcelain can increase false triggers. Matte finishes generally behave better.
- Drain hardware and bright highlights: reflective drains can create a hot spot in the sensor field.
Basin geometry quick check table
| Check item | Target or intent | Field method | Common failure if ignored |
|---|---|---|---|
| Water landing point | Land near drain centerline, not near front lip | Run water and mark landing with tape | Splash complaints, users hunt for activation |
| Sensor line-of-sight | Sensor should see hands, not drain or mirror reflections | Wave a hand at different heights and positions | False triggering or no-read events |
| Spout height vs basin depth | Enough clearance for hands without excessive splash | Measure deck to outlet and compare to basin depth | Excessive splash and nuisance activations |
| Backsplash distance | Avoid water striking wall or backsplash | Visual check with water on | Continuous wet wall, biofilm, maintenance burden |
| Adjacent fixture spacing | Reduce cross-talk and side triggers | Activate one faucet and observe neighbors | Ghost activations across a counter run |

Part 2: Pre-commissioning prerequisites
These steps eliminate half of “sensor problems” before you ever adjust a sensor.
- Flush supply lines. Construction debris and solder flux are common after turnover. Flush both hot and cold lines before final outlets are installed.
- Confirm stop valves and filters are accessible. If access requires removing a sealed panel or a full vanity drawer, future maintenance time increases.
- Verify power strategy and stability. Battery packs must be fully seated. Plug-in adapters should be secured and not shared with loose outlets.
- Verify mixing and temperature control strategy. Set below-deck mixing or thermostatic devices first. Do not tune around unstable temperature.
- Install and clean the sensor window. Remove films. Clean fingerprints and residue. A hazy lens shifts detection behavior.
Part 3: Sensor tuning workflow
Think of tuning as finding the smallest activation zone that still feels natural to users. Many manufacturers note that factory range fits most applications and range should only be changed for unusual conditions.
Step-by-step method
- Start at factory settings. If the faucet provides a formal range adjustment procedure, follow it and record the starting value.
- Map the activation window. Use painter’s tape on the deck as a grid. Test at three hand heights: low, normal wash height, and higher approach height. Mark where activation begins and drops out.
- Reduce sensitivity until false triggers stop. Typical causes include reflective drains, glossy backsplashes, adjacent motion, and strong directional lighting.
- Check cross-talk across the full counter run. Run one-user and two-user tests. Simulate wipe-down motion to validate cleaning behavior.
- Confirm shutoff behavior. Make sure removal of hands stops flow quickly. Confirm any short drip is normal spout drainage, not valve leakage.
Part 4: Timeout settings
Timeouts do two different jobs, and mixing them up causes errors:
- Run time per activation: how long it runs when hands are present or in a metered mode
- Safety timeout: hard stop to prevent continuous run if the sensor is blocked
A common commercial benchmark is a 30-second time-out feature on some platforms. Treat that as a reference point, then confirm the actual values and options in the specific manufacturer guide.
Timeout settings record table
| Setting | What it controls | Default risk | Field target (typical) | Notes |
|---|---|---|---|---|
| Safety timeout | Hard stop if sensor is blocked | Too long wastes water, too short frustrates | Often 20–45 seconds depending on model | Confirm in manufacturer guide and record final value |
| Run logic | On-demand vs metered behavior | Metered too short causes retrigger | Tune for natural handwash behavior | Validate with real users, not just installers |
| Sensor range | Detection distance | Too far creates false triggers | Smallest reliable zone | Document final value |
| Cleaning behavior | Wipe-down response | No control creates nuisance activations | If supported, enable cleaning mode | Train housekeeping and document process |
Part 5: Commissioning checklist
Use this sequence per restroom bank, not per single faucet. Many failures only appear when multiple fixtures operate together.
A. Geometry and installation
- Verify spout alignment to drain centerline
- Verify basin depth and splash control
- Confirm sensor window is clean and unobstructed
- Confirm outlet installed correctly
- Confirm hose routing has no kinks and has strain relief
B. Water and filtration
- Flush lines before final outlet installation
- Confirm strainers and filters are clean and serviceable
- Verify stable pressure and no severe hammer
C. Power and controls
- Verify battery seating or adapter connection
- Confirm cables are secured and not pinched
- Confirm mixing strategy is set and stable
D. Sensor tuning
- Start factory settings
- Map activation window at low, normal, and high hand positions
- Reduce range to eliminate false triggers
- Validate adjacent-basin cross-talk
E. Timeout validation
- Confirm safety timeout works by simulating a blocked sensor
- Confirm normal shutoff with hands removed
- Confirm no repeated cycling during normal handwashing
F. Closeout documentation
- Record final settings per faucet bank
- Capture model numbers and power type
- Provide O&M documents and a short troubleshooting quick guide
- Provide parts list for strainers and common wear items
Part 6: Troubleshooting matrix
Use this before swapping parts. Most fixes start with filtration, power seating, and sensor window condition.
| Symptom | Most likely causes | First checks | Fix path |
|---|---|---|---|
| Faucet won’t activate | Power issue, loose connector, sensor window blocked | Battery orientation, adapter output, cable seating, clean lens | Restore power, reseat cable, clean lens |
| Random activations | Reflective basin, mirror or lighting reflections, range too high | Reduce range, check drain reflectivity, test lights on and off | Tune range, reduce reflectivity, adjust basin and spout pairing if needed |
| Runs too long | Safety timeout too high, sensor seeing constant target | Test blocked sensor, check reflections from drain | Reduce range, verify timeout setting |
| Shuts off mid-wash | Timeout too short, metering mode mismatch | Verify run logic and safety timeout | Adjust run logic and timeouts |
| Low flow | Clogged strainer or filter, clogged outlet insert | Remove and clean strainer and outlet | Flush, clean, replace as needed |
| Drip after shutoff | Normal spout drainage vs valve leakage | Observe duration and check for debris | Clean valve or solenoid and verify seating |
Part 7: What to include in your commissioning submittal package
- Final settings record (range, timeouts, mode)
- As-installed model list, including power type
- IOM and maintenance PDFs for the exact installed series
- One-page field quick guide (battery replacement, filter cleaning, reset procedure)
- Recommended preventive maintenance interval based on water quality
Part 8: Accessibility and standards notes
While sensor faucets reduce the need to grasp or twist handles, coordinate the overall restroom for accessibility and operable parts requirements. Use non-brand references to keep reviews grounded and consistent.
Source links and support documents
Category pages requested
Commissioning references
Accessibility and standards
Brand technical documents referenced

Location: Atlanta, GA
Profile: Facility planning expert focused on large-scale commercial installations. Works with developers to implement durable, vandal-resistant soap dispensing solutions in stadiums, transit hubs, and educational campuses.